Are you tired of the same old boring nail polish? Do you want to spice up your manicure game and turn heads wherever you go? Well, look no further because we have the ultimate guide on how to do designs on nails! Whether you’re a beginner or a seasoned nail artist, this article will provide you with all the tips, tricks, and inspiration you need to create stunning nail designs that will make everyone envious. Get ready to unleash your creativity and transform your nails into tiny canvases of art!
Gather Your Materials And Tools
Gathering your materials and tools is the first step towards creating awe-inspiring nail designs. While it may seem like an arduous task, having everything at your fingertips will make the process smoother and more enjoyable.
- Start by compiling a selection of vibrant nail polishes in various shades. Remember to include both solid colors and some with shimmer or glitter for added dimension. Next, gather an assortment of nail art brushes in different sizes to achieve precise details or sweeping strokes effortlessly. Don’t forget about dotting tools, which can create mesmerizing patterns and gradients on your nails.
- In addition to paints and brushes, stock up on other essentials such as cuticle clippers, a buffer block, base coat, top coat, and acetone-free nail polish remover. Quality is key here – investing in professional-grade products will give you better results that last longer. Lastly, don’t underestimate the power of inspiration – collect images of stunning designs or follow top nail artists on social media to ignite your creativity when you’re feeling stuck.
By ensuring all these materials are readily available before you start designing your nails, you’ll be able to fully immerse yourself in the creative process without any unnecessary interruptions. So take the time to gather your materials and tools today; they are the building blocks that will allow your imagination to soar across each well-crafted stroke.
Choose Your Desired Design And Colors
One of the best things about doing nail designs is the freedom to choose your desired design and colors. Whether you prefer bold and vibrant or subtle and elegant, there are endless possibilities to explore. It’s all about finding what speaks to your personal style and what makes you feel confident.
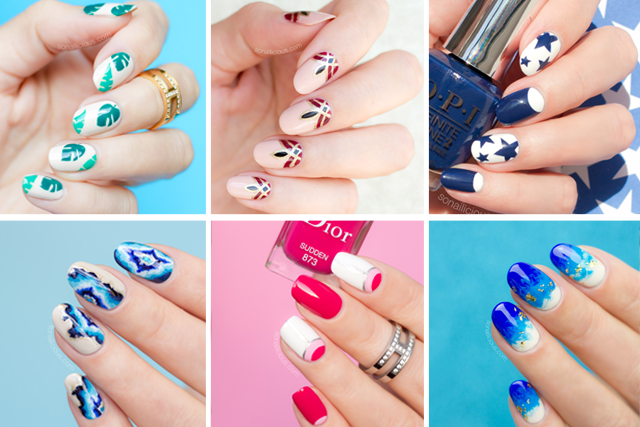
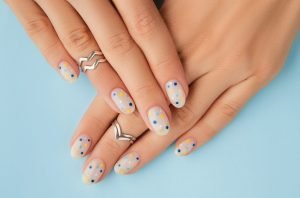
When selecting a design, consider your mood for the day or a particular event that you’re attending. For a fun outing with friends, opt for playful patterns like polka dots or stripes. If you’re going for a more professional look, go for geometric designs or simple French tips. Remember that each design has its own unique charm and can transform your nails into captivating works of art.
As for choosing colors, don’t be afraid to step out of your comfort zone! Experiment with different shades that complement your skin tone or match an outfit. Pastels are perfect for springtime freshness, while metallic hues add a touch of glamour to any ensemble. You can also mix and match contrasting colors or create ombre effects for a more eye-catching appearance.
Ultimately, nail designs allow you to express yourself through vibrant colors and intricate patterns. The possibilities are as vast as your imagination, so embrace this opportunity to bring beauty and creativity to your fingertips!
Prep And Prime Your Nails
Prepping and priming your nails is an essential step before diving into any nail design. Many nail enthusiasts may overlook or rush through this process, but trust me, it can make a world of difference in the longevity and overall appearance of your nail art.
- Start by shaping your nails to your desired length and shape, ensuring they are all even and free from any rough edges. This will create a solid foundation for your designs.
- Next, it’s time to give those nails a little TLC with some cuticle care. Gently push back the cuticles using a cuticle pusher or orangewood stick, taking care not to apply too much pressure or damage the delicate area surrounding the nail bed. Once you have pushed back the cuticles, trim away any excess skin with a pair of sterile cuticle clippers—this will not only tidy up the look of your nails but also prevent them from snagging on anything after you’ve applied your design.
- After prepping and caring for your nails’ shape and cuticles, it’s time to prime them for polish or any other decorative elements you desire. Start by gently buffing the surface of each nail with a soft buffer block—this will remove any natural oils on the surface and help create better adherence for polish or designs later on. Be careful not to over-buff as this can thin out the nails and make them weaker over time.
Apply The Base Coat
Applying the base coat is an essential step in creating stunning nail designs. Not only does it help your design last longer, but it also provides a smooth canvas for the colors and patterns to come alive. But have you ever thought about using different types of base coats to enhance your nail art? Consider using a matte base coat for a more subtle look or a glittery base coat to add some sparkle and dimension to your design. By experimenting with different textures and finishes, you can create unique nail art that sets you apart from the crowd.
Another important reason to apply the base coat is for protection. The chemicals in nail polish can stain and weaken your nails over time, so applying a good quality base coat acts as a barrier between your nails and the color pigment. This extra layer not only prevents staining but also helps strengthen and nourish your natural nails, making them less prone to breakage. So don’t skip this step – think of it as an investment in the health and longevity of your nails.
Remember that practice makes perfect when it comes to applying the base coat. Take your time and apply thin layers, allowing each one to dry before adding another. And if you’re feeling adventurous, try mixing different shades of base coats or even layering them for a multi-dimensional effect. The possibilities are endless when it comes to nail art, so don’t be afraid to get creative with the way you apply your base coat!
Get Creative With Nail Art Techniques
Get creative with nail art techniques by experimenting with different textures. Try incorporating elements like glitter, velvet, or even tiny gems into your designs for an extra touch of glamour. These textured embellishments add dimension and interest to your nails, making them truly stand out.
Another fun way to up your nail art game is by utilizing negative space. Instead of covering the entire nail bed with polish, leave some areas bare to create intricate patterns and designs. This technique not only looks modern and chic but also allows you to experiment with various color combinations and shapes.
If you’re feeling adventurous, try mixing different nail art techniques together. Create a stunning ombre effect using gradient polish colors and then add a simple yet striking design on top using a fine-tipped brush. This combination of techniques adds depth and complexity to your manicure, making it visually appealing and unique.
Conclusion:
There’s something empowering about flaunting your unique and stylish nails. They serve as a tangible form of self-expression, allowing you to showcase your personality and creativity without saying a word. From vibrant geometric patterns to intricate floral designs, the possibilities for nail art are endless. So why not embrace this opportunity to stand out from the crowd?
Not only can stylish nails enhance your overall look, but they can also boost your confidence. Just imagine the feeling of having perfectly polished nails that catch people’s attention wherever you go. Whether it’s in business meetings or social gatherings, well-designed nails can make a lasting impression and set you apart from the rest.
But beyond aesthetics and self-confidence, nail art is also a form of art therapy that provides an avenue for relaxation and stress relief. Spending time meticulously painting intricate designs on your nails allows you to channel your focus onto something creative and therapeutic. It’s like creating mini-masterpieces on a canvas no larger than an inch or two.
So next time you find yourself pondering what design to choose for your next manicure, remember the power of flaunting your unique and stylish nails. It’s not just about looking good; it’s about embracing creativity, boosting confidence, and even finding solace in the artistic process itself. Let your nails be the canvas through which you express yourself boldly and fearlessly – after all, beauty lies in every brushstroke!


Be First to Comment